Configure your GCP Cloud Resources
Installation is only required for teams on a Private Cloud plan
For Deeploy to operate successfully, Google requires several resources. This article provides an overview of the required resources and their installation process. While the article uses the gcloud CLI to demonstrate the setup steps, it's important to note that the same tasks can also be accomplished using the Google Cloud Console.
Typical customer deployment
In typical customer deployments, a separate development and production environment is established. The high-level architecture for these environments, along with the relevant GCP resources, is depicted below. Annotations continue below the image.
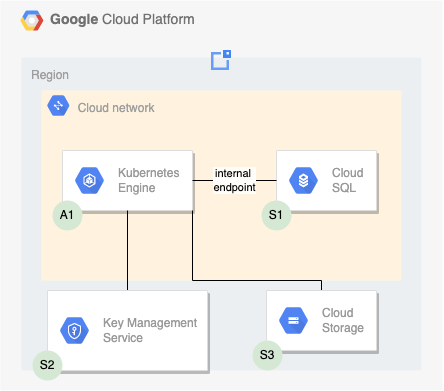
Deeploy Core components
- A1 The container platform at the core of the Deeploy.ml solution using Google Kubernetes Engine. The minimum resource requirements are: 3 (v)CPU and 6 GB RAM
- S1 Storage of configuration, parameter & relational data using Google Cloud SQL for PostgreSQL
- S2 Persistent storage of model files using Google's Cloud Storage
- S3 Storage of Secrets & Certificates using Google's Key Management System The set up of each of these components is explained in this article.
Setting up cloud resources
For production environments, we recommend managing cloud resources as infrastructure-as-code, using tools such as Terraform.
Create a service account
To begin, enable the Access Management API (IAM API) by following the instructions in the IAM documentation. If you require additional information on the use of service accounts in Google, please refer to the service account documentation.
To verify that your gcloud environment is configured with the correct project, run the command below:
gcloud config get-value project
In case the wrong project is selected, use gcloud to select your project using the command below.
cloud config set project <PROJECT_ID>
Now you're ready to create a service account for your project. Use the command below to create a service account for your project.
gcloud iam service-accounts create <NAME> \
   --description="<DESCRIPTION>" \
   --display-name="<NAME>"
To make sure your service account is created, the following command can be executed. The display name used to create your service account should appear in the list.
gcloud iam service-accounts list
Since we now have a service account to work with, we can create a key for this service account to start using its functions. This can be done using the command below.
gcloud iam service-accounts keys create <FILE_PATH>.json --iam-account=<NAME>@<PROJECT>.iam.gserviceaccount.com
Once the service-account key is created, the different components can be installed.
A1: Google's Kubernetes Engine
To set up the Google Kubernetes Engine (GKE), create a cluster using the command below. For the initial setup, we recommend creating a cluster with at least: 3 e2-standard-2 nodes using the --num-nodes=1 (1 per zone in the region, so 3 in total) and --machine-type=e2-standard-2 flags. Moreover, we configure a VPC network that we share between all Deeploy GCP cloud resources. You can add the required information for an existing network using the following flags: --network, --subnetwork and --region You can use any zone from Google's list of zones to set up your cluster. If you need to create a new VPC network follow these instructions.
gcloud container clusters create <NAME> \
  --network=<VPC_NETWORK_NAME> \
  --subnetwork=<SUBNETWORK> \
  --region=<REGION> \
  --machine-type=e2-standard-2 \
  --num-nodes=1 \
  --enable-autoscaling --max-nodes=5 --min-nodes=1
Once your cluster is created, the cluster still has to be added to your kubeconfig in order to access it locally. We recommend using Lens to get an insight into your cluster.
gcloud container clusters get-credentials <NAME> --zone=<ZONE>
If the cluster is added to your kubeconfig, consider A1 completed.
GPU support
For GPU support we recommend attaching an autoscaling node group with your preferred GPU node type that can scale to 0 to your GKE cluster. Alternatively use Karpenter as a flexible scheduler. To make sure no other pods will be scheduled on GPU nodes you can add the following taint to your node pool:
taints:
- key: nvidia.com/gpu
  value: present
  effect: NoSchedule
When specifying a GPU node for a Deeploy deployment, automatically the nvidia.com/gpu label will be applied.
To make sure you can select the nodes that are scaled to 0 in Deeploy, add a list of node types to the values.yaml file when you install the Deeploy Helm chart.
S1: Google Cloud SQL for PostgreSQL
To create an instance for our PostgreSQL database, first enable the Cloud SQL Admin API via the button of step 5 in the Cloud SQL Documentation. Create an SQL instance using the command below. We recommend using at least 2 CPUs and a minimum memory limit of 3840MB.
gcloud sql instances create <NAME> \
   --database-version=POSTGRES_13 \
   --region=<REGION> \
   --cpu=2 \
   --memory=3840MB \
   --project=<PROJECT_ID> \
   --network=projects/<PROJECT_ID>/global/networks/<VPC_NETWORK_NAME> \
   --no-assign-ip
In order to create an internal IP for internal communication with the Kubernetes cluster, we defined the project, network & no-assign-IP flags.
S2: Google Cloud Storage
Setting up Google Cloud Storage is a simple process. All you need to do is create a bucket for Deeploy to store its data. This can be accomplished using the gsutil tool, which is included with your gcloud installation.
gsutil mb gs://<BUCKET_NAME>
Once you create the bucket, Google Cloud Storage is set up.
Use the service account you created earlier to let Deeploy access the GCS bucket. Add permissions to administer the bucket in the following way:
gsutil iam ch serviceAccount:<NAME>@<PROJECT>.iam.gserviceaccount.com:roles/storage.admin gs://<BUCKET_NAME>
S3: Google's key management system
To get started, enable the Key Management Service (KMS) API by clicking the button in the KMS documentation.
Once the API is enabled, you need to create a key ring and a key within it. To create the key ring, run the following command:
gcloud kms keyrings create "<KEYRING_NAME>" --location "<REGION>"
We can now create a key within this keyring using the command below.
gcloud kms keys create "<KEY_NAME>" \
   --location "<REGION>" \
   --keyring "<KEYRING_NAME>" \
   --purpose "asymmetric-encryption" \
   --default-algorithm "rsa-decrypt-oaep-2048-sha256"
To confirm that the key has been created, the following command can be used:
gcloud kms keys list \
   --location "<REGION>" \
   --keyring "<KEYRING_NAME>"
If the key appears in your keyring, your KMS is set up correctly.
Use the service account created earlier to let Deeploy access the key you created for encryption. We add permissions to use the key in the following way:
gcloud kms keys add-iam-policy-binding <KEY_NAME> \
    --keyring "<KEYRING_NAME>" \
    --location <REGION> \
    --member serviceAccount:<NAME>@<PROJECT>.iam.gserviceaccount.com \
    --role roles/cloudkms.cryptoOperator